一个天气预报APP
Weather Broadcast APP
Created: December 3, 2022 12:43 AM
视频展示
一、主要功能
1、主视图和细节视图
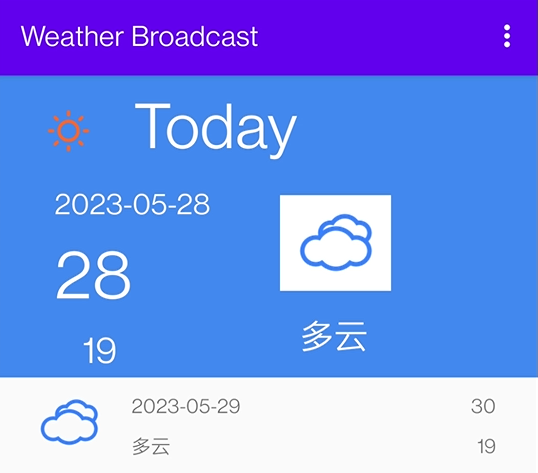
在手机中包含主视图和细节视图,主视图显示连续多天的天气预报简讯,如图表 1所示,用户在主视图中点击某一天的天气简讯以后,跳出细节视图,显示用户选定当天天气的详细信息。

2、 支持平板显示
在平板中使用Master-detail视图,当用户点击某一天的天气预览以后,直接在界面右边显示当天天气的详细信息,如图表 3所示。

3、主视图菜单栏功能实现
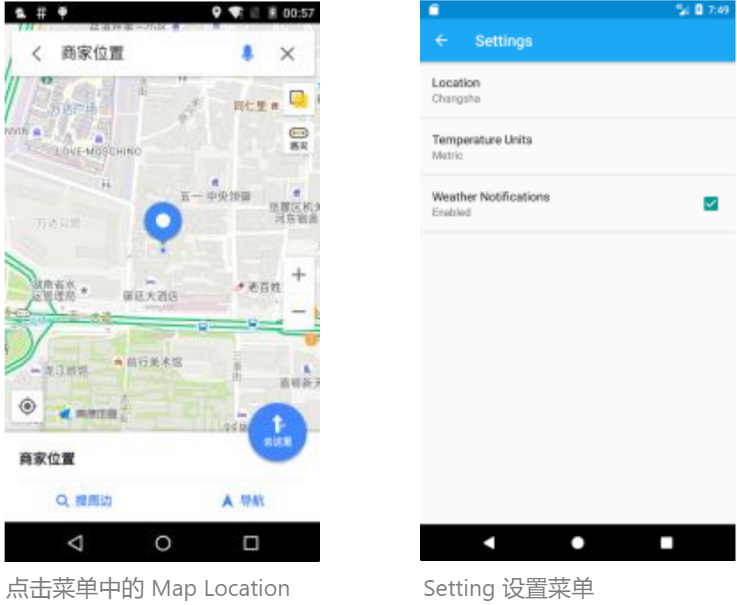
主视图中包含Map Location和setting选项,通过”Map location” 选项,可以调用手机中安装的地图应用显示当前天气预报所对应的位置,如图表 4所示,用户可以通过setting选项可以修改天气预报的位置,温度的单位(华氏度、摄氏度)以及是否开启天气通知,如图表 5所示。如果setting选项中的天气通知选项打开,会定期发送通知消息,其中显示当天的天气简讯,如图表 6所示。

4、细节视图菜单栏功能实现
细节视图菜单中包含分享和setting选项,用户可以通过分享选项通过其他应用(邮件、短信等)将天气详细信息分享给别人。如图表 2所示。

5、SQLite对天气预报数据进行持久化保存
利用SQLite对天气预报数据进行持久化保存,如果网络不可用的情况下,从SQLite中提取天气预报数据。
6、调用Web API获取天气预报数据
heweather:https://www.heweather.com/documents/api/s6/weather-forecast
二、开发细节
1、UI设设计

2、MainActivity+平板功能实现
功能
判断设备是
phone/paid并托管到不同的layout文件中平板功能实现:在平板中使用Master-detail视图,当用户点击某一天的天气预览以后,直接在界面右边显示当天天气的详细信息。
实现方式一:
MainFragment.WeatherHolder中的onClick()中将DetailFragment添加到detailFragmentContainer中。缺点:破坏fragment的封装
实现方式二:在
fragment中定义回调接口,委托托管activity来完成那些不应该由fragment处理的任务。
知识点
- 别名资源指向了不同的资源文件

- Fragment回调接口
Fragment回调接口的实现
MainFragment添加回调接口
1 | private Callbacks mCallbacks; //回调接口 |
- 在
Mainactivity中实现
1 | /* |
- 在
MainFragment中调用
1 |
|
3、MainFragment
功能
- 实例化单例
- 实例化数据库
- 实例化
RecyclerView - 监听用户点击,并跳转到
DetialActivity - 从网上获取数据,并显示在组件中
- 监听
Menu的点击事件
知识点
RecyclerView实例化及其逻辑实现Menu实例化,并实现监听- 启动后台线程
AsyncTask,实现数据获取 Fragment跳转到Activity并传递数据notification实现消息推送SQLlite实现数据持久化
要点
1、从Fragment跳转到Activity并传递数据
MainFragment
1 | //调用Fragment.startActivity(Itent) |
DetailActivity
1 | private static final String EXTRA_WEATHER_ID = "com/example/weatherbroadcast.weather_id"; |
4、DetailActivity
功能
- 托管DetailFragment
- 传递数据WeatherID
知识点:FragmentAugment实现
**DetailActivity获取数据并传递给其托管的Fragment的两种方法**
- 直接获取数据,直接传递——由Activity获取数据
UUID是Serializable对象
1 |
|
缺点:
破坏了**CrimeFragment的封装,CrimeFragment**不再是可以复用的单元。
- 使用
fragmentargument——由Fragment获取数据
augment:参数
将weatherID存储到Fragment的某个地方而不是Activity中。
每个Fragment实例都有一个**Bundle对象,Bundle**对象包含键值对,可以将参数添加到**Bundle**对象中
1 | //附加augmentbundle给Fragment |
5、PagerActivity
功能
- 实现左右滑动屏幕
知识点:ViewPager实现
步骤:
- 创建
PagerActivity类,以VeiwPager为根视图 - 定义包含
ViewPager的视图层级结构 - 在
PagerActivity类中关联使用ViewPager及其Adapter
Bug
只能显示6天的Pager
Bug修复:我把数据库课WetherLab封装在一起了
代码
1 | public class PagerActivity extends AppCompatActivity { |
6、SQLlite+WeatherLab单例封装
功能
- 实现数据持久化
知识点
- 单例如何实例化?
在类中声明为静态变量并且实例化。
1 | public class WeatherLab { |
- 这里将数据库也实现单例
1 | public static Context getContext(){ |
- 实现数据库
Schema类:定义描述数据表元素的String常量
1 | public class DbSchema { |
- DataBaseHelper类
1 | public class DatabaseHelper extends SQLiteOpenHelper { |
修改WeatherLab:改用数据库存储数据
- 实现
CursorWrapper子类帮助查询数据库
1
2
3
4
5
6
7
8
9
10
11
12
13
14
15
16
17
18
19
20
21
22
23
24
25
26
27
28
29
30
31
32//创建Cursor子类用于查询
public class WeatherCursorWrapper extends CursorWrapper {
public WeatherCursorWrapper(Cursor cursor) {
super(cursor);
}
public Weather getWeather() {
String UUID = getString(getColumnIndex(DatabaseHelper.DbSchema.Cols.UUID));
String DATE = getString(getColumnIndex(DatabaseHelper.DbSchema.Cols.DATE));
String MAX_TEMP = getString(getColumnIndex(DatabaseHelper.DbSchema.Cols.MAX_TEMP));
String MIN_TEMP = getString(getColumnIndex(DatabaseHelper.DbSchema.Cols.MIN_TEMP));
String WEATHER = getString(getColumnIndex(DatabaseHelper.DbSchema.Cols.WEATHER));
String HUMIDITY = getString(getColumnIndex(DatabaseHelper.DbSchema.Cols.HUMIDITY));
String PRESSURE = getString(getColumnIndex(DatabaseHelper.DbSchema.Cols.PRESSURE));
String WIND = getString(getColumnIndex(DatabaseHelper.DbSchema.Cols.WIND));
String ICON = getString(getColumnIndex(DatabaseHelper.DbSchema.Cols.ICON));
Weather weather = new Weather();
weather.setId(java.util.UUID.fromString(UUID));
weather.setDate(DATE);
weather.setMaxTemperature(MAX_TEMP);
weather.setMinTemperature(MIN_TEMP);
weather.setWeather(WEATHER);
weather.setHumidity(HUMIDITY);
weather.setPressure(PRESSURE);
weather.setWind(WIND);
weather.setIconUrl(ICON);
return weather;
}
}1
2//实例化WeatherCursorWrapper
WeatherCursorWrapper cursor = queryWeathers(null, null);**ContentValues:键值储存类,只能处理SQLite数据**
1
2
3
4
5
6
7
8
9
10
11
12
13
14//ContentValues:键值储存类,只能处理SQLite数据
private static ContentValues getContentValues(Weather weather) {
ContentValues values = new ContentValues();
values.put(DatabaseHelper.DbSchema.Cols.UUID, weather.getId().toString());
values.put(DatabaseHelper.DbSchema.Cols.DATE, weather.getDate());
values.put(DatabaseHelper.DbSchema.Cols.MAX_TEMP, weather.getMaxTemperature());
values.put(DatabaseHelper.DbSchema.Cols.MIN_TEMP, weather.getMinTemperature());
values.put(DatabaseHelper.DbSchema.Cols.WEATHER, weather.getWeather());
values.put(DatabaseHelper.DbSchema.Cols.HUMIDITY, weather.getHumidity());
values.put(DatabaseHelper.DbSchema.Cols.PRESSURE, weather.getPressure());
values.put(DatabaseHelper.DbSchema.Cols.WIND, weather.getWind());
values.put(DatabaseHelper.DbSchema.Cols.ICON, weather.getIconUrl());
return values;
}- 删除数据库之后记得立马要
create一个,不然quary报错
1
2
3
4
5
6
7
8
9
10
11
12
13
14
15
16
17
18
19
20
21//判断数据库是否为空
public boolean isEmpty(){
WeatherCursorWrapper cursor = queryWeathers(null, null);
return cursor.getCount()==0||cursor==null;
}
//如果数据库不为空
if(!sWeatherLab.isEmpty()){
mDatabase.execSQL("drop table "+DatabaseHelper.DbSchema.NAME);
mDatabase.execSQL("create table "+ NAME+"("+
"_id INTEGER PRIMARY KEY AUTOINCREMENT,"+
DatabaseHelper.DbSchema.Cols.UUID+" text, "+
DatabaseHelper.DbSchema.Cols.DATE+" text,"+
DatabaseHelper.DbSchema.Cols.MAX_TEMP+" text,"+
DatabaseHelper.DbSchema.Cols.MIN_TEMP+" text,"+
DatabaseHelper.DbSchema.Cols.WEATHER+" text,"+
DatabaseHelper.DbSchema.Cols.HUMIDITY+" text,"+
DatabaseHelper.DbSchema.Cols.PRESSURE+" text,"+
DatabaseHelper.DbSchema.Cols.WIND+" text,"+
DatabaseHelper.DbSchema.Cols.ICON+" text"+
")");
}- 实现
报错 table WeatherTab has no column named min_temp

table WeatherTab has no column named min_temp in “INSERT INTO WeatherTab(min_temp,pressure,date,icon,uuid,wind,max_temp,humidity,weather) VALUES (?,?,?,?,?,?,?,?,?)”
原因:数据表创建语句中字段前没有空格
table xxx has no column named id (code 1)?表中插入数据找不到字段?_奋斗的IT小民工的博客-CSDN博客
7、Share功能
功能
- 点击Menu分享键分享天气
知识点
- 隐式Intent的组成
- 要执行的操作
- 待访问数据的位置
- 操作涉及的数据类型
- 可选类别
代码
1 | case R.id.share: |
8、Notification——IntentService的子类
功能
- 定期发送通知给用户,显示在状态栏中
- 保证用户在使用应用时不出现新结果通知
知识点
后台服务:IntentService
SharedPreferences:保存数据(location、unit)
AlarmManager延迟运行
通知消息:Notification
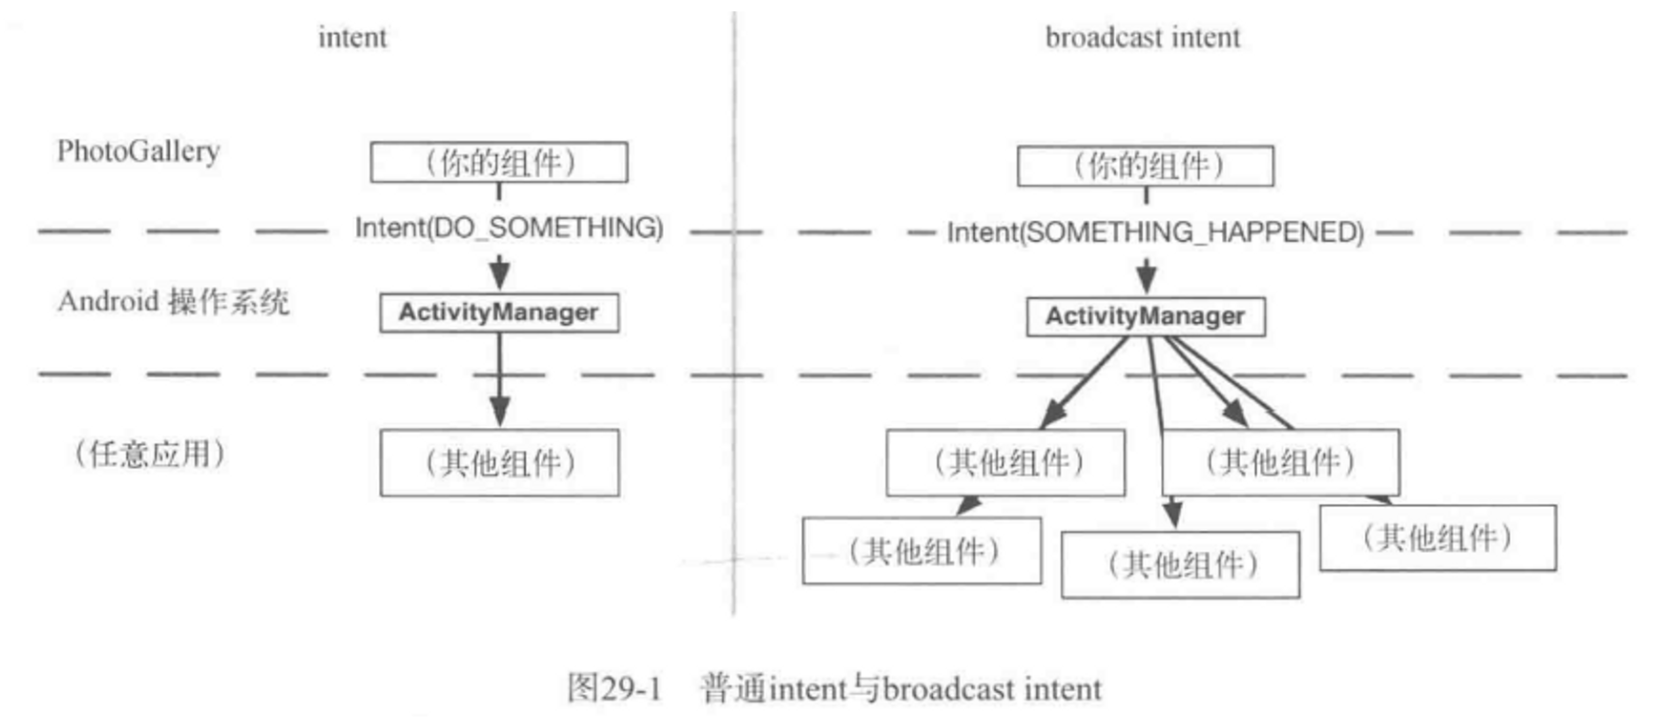
Broadcast Intent
后台服务:IntentService
- 创建**
IntentService**类继承IntentService manifest中配置<service android:name=".Notification"></service>
注意构造函数不能带参数
- 在
MainFragment的onCreate()中添加服务启动代码
1 | //启动Notification服务 |

IntentService在没有
activity运行的情况下为在后台运行的服务,需要想个办法启动它。使用**
AlarmManager:可以发送intent的系统服务**使用
PendingIntent打包一个intent:”我想启动Notification服务”在
PendingIntent中实现一个启停定时器的setServiceAlarm()- 添加定时方法
1
2
3
4
5
6
7
8
9
10
11
12
13
14
15
16//设置时间间隔是1分钟
private static final long NOTI_INTERVAL_MS = TimeUnit.MINUTES.toMillis(1);
public static void setServiceAlarm(Context context,boolean isOn){
Intent i = Notification.newIntent(context);
//创建一个用来启动Notification服务的PendingIntent
PendingIntent pendingIntent = PendingIntent.getService(context,0,i,FLAG_MUTABLE);
//设置定时器
AlarmManager alarmManager = (AlarmManager) context.getSystemService(Context.ALARM_SERVICE);
if(isOn){
alarmManager.setRepeating(AlarmManager.ELAPSED_REALTIME, SystemClock.elapsedRealtime(),NOTI_INTERVAL_MS,pendingIntent);
}
else{
alarmManager.cancel(pendingIntent);
pendingIntent.cancel();
}
}- 使用
PendingIntent管理定时器
1
2
3
4
5public static boolean isServiceAlarmOn(Context context){
Intent intent = NotificationService.newIntent(context);
PendingIntent pendingIntent = PendingIntent.getService(context,0,intent,PendingIntent.FLAG_NO_CREATE);
return pendingIntent!=null;
}- 在
MainFragment中设置定时开/闭
1
2
3
4
5
6
7
8
9
10
11public void onResume() {
super.onResume();
SharedPreferences pref = getActivity().getSharedPreferences("set", MODE_PRIVATE);
String send = pref.getString("send","是");
if (send=="是"){
//开启后台服务,启动定时器,发送通知消息
NotificationService.setServiceAlarm(getActivity(),true);
}else{
NotificationService.setServiceAlarm(getActivity(),false);
}
}
Notification
- 创建
Notification对象
完整的notification包括:
- 首次显示通知消息时,在状态栏上显示ticker text、图标
- 在Lollipop之后状态栏上不显示ticker text、图标
- 是通知抽屉的一个视图
- 待触发的
PendingIntent,用户点击抽屉中的通知消息触发
1 |
|
从Android8.0开始,应用显示通知时,必须为通知指定一个Channel。
NotificationChannel构造方法需要三个参数,
ChannelId是自定义的字符串- 第二个参数是频道的名称
- 第三个是优先级。
创建完NotificationChannel之后,还需要使用createNotificationChannels方法注册到系统中。
Broadcast Intent(待实现)
9、Map功能
功能
- 点击MapLocation启动手机中的Map
知识点
- 隐式Intent的组成
1 | Intent intent = new Intent(Intent.ACTION_VIEW); |
Bug
MapApp无法显示定位